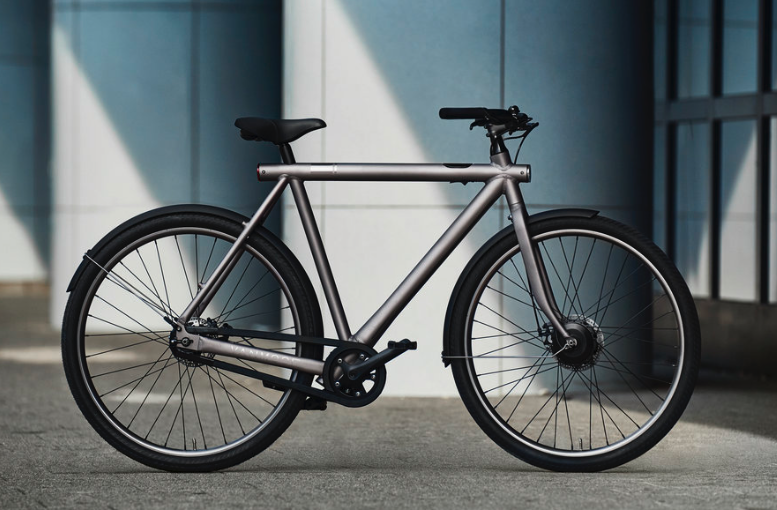
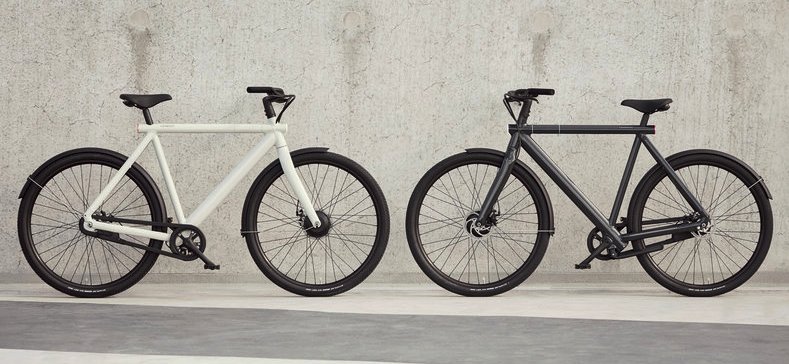
Side by side comparison of the brand new VanMoof S3 with the VanMoof Electrified S2. There are some nice upgrades.
🚲 If you consider buying an S3/X3, use the following discount code during checkout and get €100/$100/£95 off on VanMoof accessories & PoM services: ADV-Y78Q-4S9G-HEM7
These pedals look nicer on your VanMoof
Electrified S2 (2019)
Brand New S3 (2020)
Breaks
Mechanical Disk Breaks
Hydraulic Disk Breaks
Gears
Mechanical (automatic) 2-Speed
E-Shifter (electronic) 4-Speed
Engine Torque
30 Nm
59 Nm
Engine Power
250-500 Watts
250-500 Watts
Boost
Strong Acceleration
Extremely Strong Acceleration
Top Speed
38 km/h
42 km/h
Speed Mode
US (32), EU (25 km/h), Japan (24)
US (32), EU (25 km/h), Japan (24)
Range
60-150* KM
60-150* KM
Battery
504 Wh
504 Wh
Weight
19 KG
19 KG
Bell
Not Customisable (Submarine)
Customisable (Party, Submarine, Ding Dong)
Speaker
Kind of Loud
Louder than S2
Kick Lock
Incl. with Alarm
Incl. with Alarm
Colors
Gray, White
Dark, Light
Quick Comparison Table for VanMoof Electrified S2 and S3
Hill Challenge; riding up a steep hill %15 incline, comparing the VanMoof S3 and the Electrified S2. Winner is 🥇 S3.
How does the E-Shifter of the VanMoof S3 works and sounds?
VanMoof S3 acceleration on a flat road from 0-40 km/h in 11 seconds. Even faster then many scooters with electric or petrol.
Conclusion: must buy, order one from vanmoof.com today.
🚲 Buy a VANMOOF S3 or X3 ? Apply the VanMoof discount code below during checkout to get €100/$100/£95 off on Accessories & PoM services : ADV-Y78Q-4S9G-HEM7
Blending technology and design for e-mobility is the motivation of this blog. If you want to know more about new perspectives and ideas in this context, subscribe to VanMoofer on Medium, follow us on Instagram and Twitter. You can also check suitable VanMoof-Gear and if you like support us with a cup of a coffee ☕️.
🚲 Last but not least, if you consider buying an S3/X3, use the following discount code during checkout and get €100/$100/£95 off on VanMoof accessories & PoM services: ADV-Y78Q-4S9G-HEM7
After receiving many questions regarding this topic, I decided to take a look at the speed settings of my Vanmoof Electrified S2.
🚲 If you consider buying an S3/X3, use the following discount code during checkout and get €100/$100/£95 off on VanMoof accessories & PoM services: ADV-Y78Q-4S9G-HEM7
Europe 🇪🇺
Support Level
Speed
Boost
1
16 km/h
25 km/h
2
22 km/h
25 km/h
3
25 km/h
27 km/h
4
27 km/h
29 km/h
United States 🇺🇸
Support Level
Speed
Boost
1
16 km/h
32 km/h
2
25 km/h
32 km/h
3
28 km/h
32 km/h
4
32 km/h
32 km/h
Blending technology and design for e-mobility is the motivation of this blog. If you want to know more about new perspectives and ideas in this context, subscribe to VanMoofer on Medium, follow us on Instagram and Twitter. You can also check suitable VanMoof-Gear and if you like support us with a cup of a coffee ☕️.
🚲 Last but not least, if you consider buying an S3/X3, use the following discount code during checkout and get €100/$100/£95 off on VanMoof accessories & PoM services: ADV-Y78Q-4S9G-HEM7
Artık APCOA FLOW ile arabanızı Almanya’da biletsiz olarak park edebilirsiniz. Tek yapmanız gereken uygulamayı yüklemek ve gerekli adımları izlemek. Eğer size vereceğim 3VAOT1 (yazıyla: Üç Van Ankara Ordu Tokat Bir ) kodunu da girerseniz, ilk parkınızdan 10 Euro indirip alacaksınız. Sistem Türkiye’deki HGS sistemine benziyor. Tıpkı HGS etiketi gibi bir etiket adresinize postalanıyor. Etiketi aracınızı ön camına (iç kısıma) yapıştırıyorsunuz. APCOA otoparklarına aracınızla geldiğinizde kapı size otomatik açılıyor, aynı şekilde otoparktan çıkarken de herşey otomatik şekilde gerçekleşiyor. Otoparkta kaldığınız süre (ilk 5 dakika ücretsiz olmalı) hesaplanıyor otomatik olarak banka/kredi kartınızdan alınıyor. Böylelikle park kartını ödemek için vs. gereksiz zaman harcamaktan da kurtulmuş oluyorsunuz. Uygulamayı hemen indirin: https://apcoa.onelink.me/fSQz/d5ab59b
🚲 Buy a VANMOOF S3 or X3 ? Apply the VanMoof discount code below during checkout to get €100/$100/£95 off on Powerbank, Accessories & PoM services : ADV-Y78Q-4S9G-HEM7
Vanmoof. The coolest bike that I’ve ever seen. Ordered it without seeing it in real 🙈 no test rides.
Last year summer, while I was surfing the web I came across to an advert. I said ‘wow!’ to myself. Usually I don’t click adverts but this time I had to make an exception.
An awesome design, great features, high-tech stuff, to keep it short: what a bicycle? It’s called Vanmoof Electrified S2.
OK, the price was not cheap (it was advertised for early bird 2599 and it was written that the list price is gonna be 3399 euros). It was too late, the devil was already sitting on my shoulder. I searched videos of the bicycle online. There was only one video from Vanmoof Electrified S2 since it was even not in production yet. However, I could find many of them from the previous version, Electrified S.
It was also great. I told it to myself (or the devil in me) you should have it. Now (while I am writing this post), just checked the confirmation email, on June 28th, 2018 I gave the order.
The pre-order required an advanced payment of 100 euros, which I could get back if I would have changed my mind.
The delivery was shown as Jan/Feb 2019 and surely, I was one of the early early birds.
Worth the wait. Waiting was actually exciting too. Nov 16th, 2018 I received the email for final payment. I had to pay the rest amount, a.k.a 2499 euros. Puhh. It was a hard click ‚pay‘, I thought if I don’t like the bike, I can always send it back in the first 30 days and get a full refund.
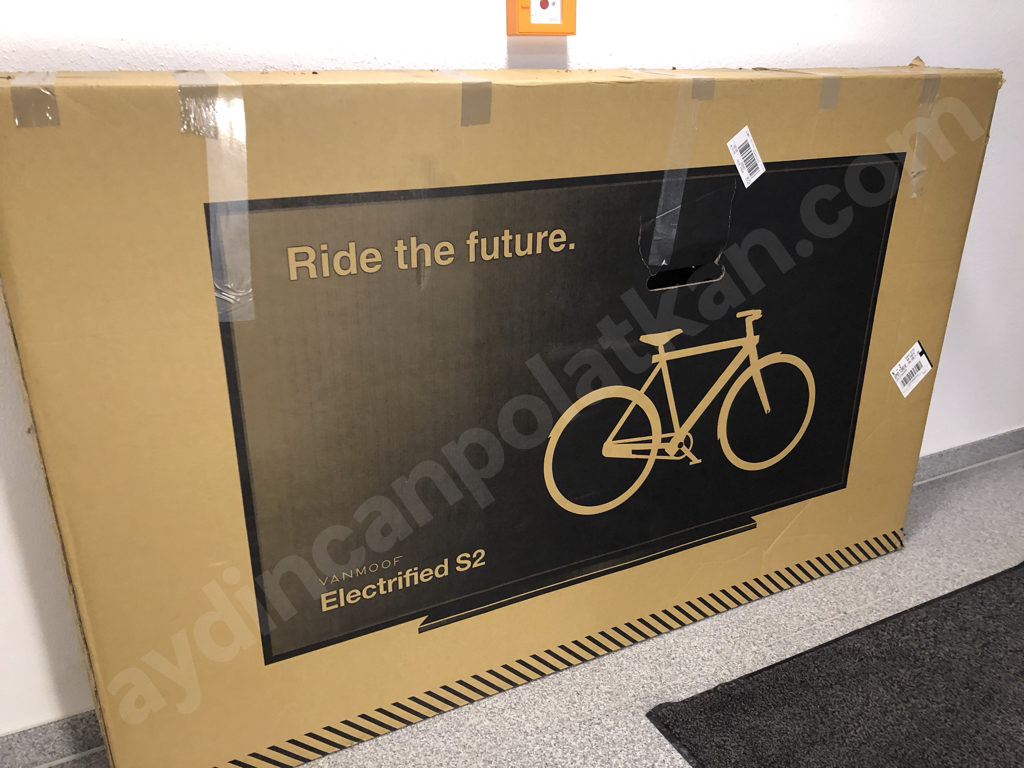
Almost half a year later from the reservation day; Jan 24th, 2019 I received a shipment email and there it was, delivered at my door on Jan 28th, 2019.
In a box with a huge TV image on it, what a brilliant ‘strategic product innovation’. There is an article out there, speaking of how Vanmoof minimised the delivery (especially in the United States) damages of their bikes. Since the carriers are being more gentle to a TV set rather than a bicycle.
I am living in a university town, where there are many bicycles. I am sure there are very nice ones but there is only one Vanmoof Electrified S2. 😅
Vanmoof Electrified S2 is a electric bicycle or pedelec as they say in Germany. It can support the rider up to 25km/h in Europe and 32km/h in the US. This Europe/United States change can be set via its mobile phone app. Download iOS and Android.
How the app looks like? Watch the video:
If you like my videos please consider subscribing to my channel and give a shoutout about what would you like to see.
How to take good care of your Vanmoof?
Let’s pay attention to what users are speaking about Electrified S and S2 in the www.
Crankshaft is prone to loosening (it may also create a ‘woobling’ feeling while pedalling).
Disk brakes need constant adjustment (lets say every 100 kms) and make a scraping sound which can’t be avoided.
☝️ this can help as well
It has a noise chain guard when it’s wet. Make sure the chain is not lubricated more than necessary otherwise it will attract more muck and make more noise.
Update your iOS or Android app also check the latest version of your bicycle’s firmware, if it’s old and you see no update available then contact the customer support, via twitter or website.
Keep tyres properly inflated; they tend to lose some pressure even when not punctured and this KILLS economy and thus range.
Periodically make sure all bolts are tightened – especially handlebar head bolt.
Check lights turn on/off correctly; the light sensor can become oversensitive.
If your rear gearbox (SRAM Automatix) starts to make cracking noises (defective) or change up/down inconsistently (adjustment) it’s time to get it checked.
Your LBS can do this, or there are plenty of vids on Youtube.
Apart from this the only issues with ES17s tend to be electronic: Err29s and so on which you can’t ‘maintain’ your way out of.
Make friends with your local VM store and you’ll be fine because VM service is outstanding.
🚲 Buy a VANMOOF S3 or X3 ? Apply the VanMoof discount code below during checkout to get €100/$100/£95 off on Powerbank, Accessories & PoM services : ADV-Y78Q-4S9G-HEM7
Haftada bir kere alışveriş yapıyorsunuz ve tamam online alışveriş nedir artık A’dan Z’ye söz sahibisiniz. Tebrikler… Peki ya size bir sorum var, hiç Cashback diye birşey duydunuz mu?
Internet’ten alışveriş yapmak artık dünyanın hemen hemen her ülkesinde insanların vazgeçilmezlerinden oldu denebilir. Sıcacık evinizin rahatlığında binlerce online mağazadan alışveriş yapabiliyorsunuz ve aldığınız ürünleri 14 gün boyunca mazeret bildirmeden dahi (bazı online alışveriş sitelerinde mevcut, örneğin Amazon) geri gönderebiliyorsunuz.
Madem duymadınız ben anlatayım. Cashback bir nevi süpermarketlerdeki, benzin istasyonlarındaki puan toplama sistemi gibi bir sistem, ancak puanları puan olarak değilde direk TL/$/€ para birimlerinde alabilirsiniz.
Bu Cashback istelerinden Almanya’da en çok üye internet mağaza üyesi olanlar iGraal ve Shoop. Bu siteleri kullanarak Hotel rezervasyonu da yapabilirsiniz. Her iki sitede de Booking.com ve/veya Hotels gibi internet servisleri mevcut. Alışveriş, rezervasyon yapacağınız ya da hesap açacağınız sitelere iGraal ve/veya Shoop üzerinden gidin. Böylece yaptığınız ödemenin veya kaydın bir kısmı tekrar geri alabileceksiniz.
Bir örnek vermek gerekirse iGraal, Hotels üzerinden bugün %8 Cashback geri alabiliyorsunuz ve benzer şekilde Shoop‘da Hotels için %7 ile %5 arasında Cashback geri alınıyor. 100€’luk bir alışverişinizde 8€ bir süre sonra tekrar hesabınıza yatacaktır.
If you consider buying a S3/X3, use the following discount code during checkout, get €100/$100/£95 off on VanMoof accessories & PoM services: ADV-Y78Q-4S9G-HEM7
At the end of 2018, I started to think about finding ways to eliminate the hills of Tübingen while riding a bicycle. Naturally, I started to search for electric bicycles, e-scooters, electric scooters.
I came across to Vanmoof Electric S2. Thanks to social media and its heavily integrated advertisement infrastructure. I checked the website and liked it a lot, then I watched the videos on youtube to see how was the previous model. In the end, the 30-days trial period made me decide to order. I pre-ordered the e-bike in November and it arrived at the end of January.
Here are some videos I’ve recently made.
If you wonder how the engine of the Vanmoof Electrified S2 sounds like, then you should watch this one.
***
If you consider buying a S3/X3, use the following discount code during checkout, get €100/$100/£95 off on VanMoof accessories & PoM services: ADV-Y78Q-4S9G-HEM7
Did you create your first Einstein Analytics application? Clean and neat! I assume that you’ve already designed a data flow, ran it already to generate your application dataset. Created a dashboard with lenses in place, filters, lists, charts to visualise the dataset.
It’s already great, now you can go to Einstein Analytics, click on your application. Check the charts, read your data, understand it easier than before. Read any change at a glance, easy peasy. You answered your own questions with it but there are many people out there who are struggling with the same problems. What’s next?
Well, you can share your solution with them from A to Z. However, you first need to create a template. Here is how!
Check out the Step 1 to Create (or Update) the Template Objects then you follow the next steps according to the interests of your Einstein Analytics applications.
If you need to define rules or create a wizard for your Einstein Analytics application then it’s possible to change this by following Step 3 to Edit the JSON Files.
For example, the wizard is how you ask your future template user to decide which dimensions in a dataset to include and which to exclude, what name a new dashboard, or how to label a field in a chart. You control all this by editing the four types of JSON files discussed in this step (template-info.json, ui.json, variables.json, and any number of rules.json), which constitute the template assets.
In order to create more insight on sales data, Einstein Analytics can be great help. In order to bring Einstein Analytics into the game, it’s required to create relevant data flows, datasets, dashboards in other words an EA application.
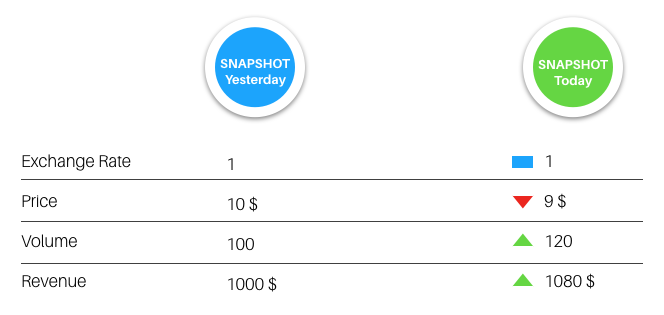
The aim here is to bring a solution for better understanding the relations between profitability/loss at first sight. In order to achieve this goal, daily data collection is important, this means running the data flow everyday and get the ‘exchange rate’, ‘price of the products’, ‘partial and/or total volumes’ and naturally the ‘revenue’ and ‘date’. Basically take a snapshot of the data.
The data flow runs daily and stores the data in a table. The data table grows by addition of new rows. The data table also includes ‘snapshot date’, ‘exchange rate’, ‘price’, ‘volume’ and ‘revenue’ fields as columns.
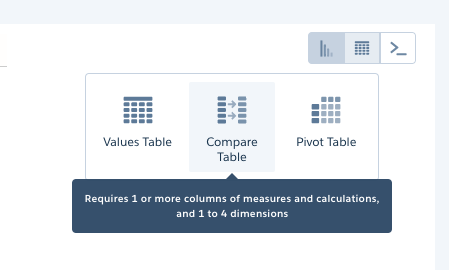
In order to calculate the changes shown in the figure above, you need to use the compare table.
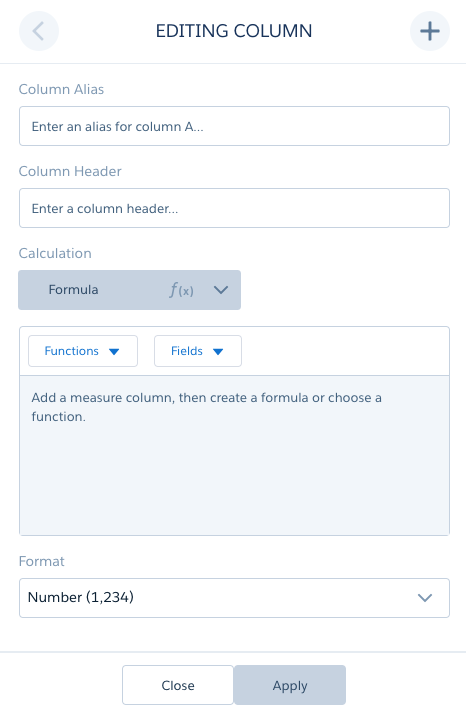
when you edit a lens in the dashboard, choose ‘compare table’
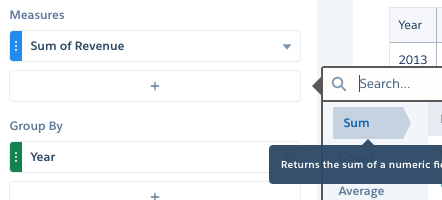
You need to add measures then click on the ‘arrow down’ icon and select ‘Edit this column’ option of a measure to define formulas for the column.
add new measures and edit them
While editing the columns (measures) you can assign new aliases. For example in the use case which is defined here, one can expect two snapshots having two different revenue values and a new column to calculate the ‘change in revenue’. It’s easy to set the alias R1 for ‘snapshot #1’s revenue’ as R2 for ‘snapshot #2’s revenue’. It’s simple! Defining the ‘change in revenue’ requires a new column with a formula calculation of ‘R2-R1’. You can also define window functions for different groups of data.
give alias, column names and define formulas when editing the columns of the compare table
Once you have all the columns and their formulas defined, you can save the compare table and transform it into a chart. The calculations are done, dynamically and displayed as bars, slices or as gauges according to your chart choices.
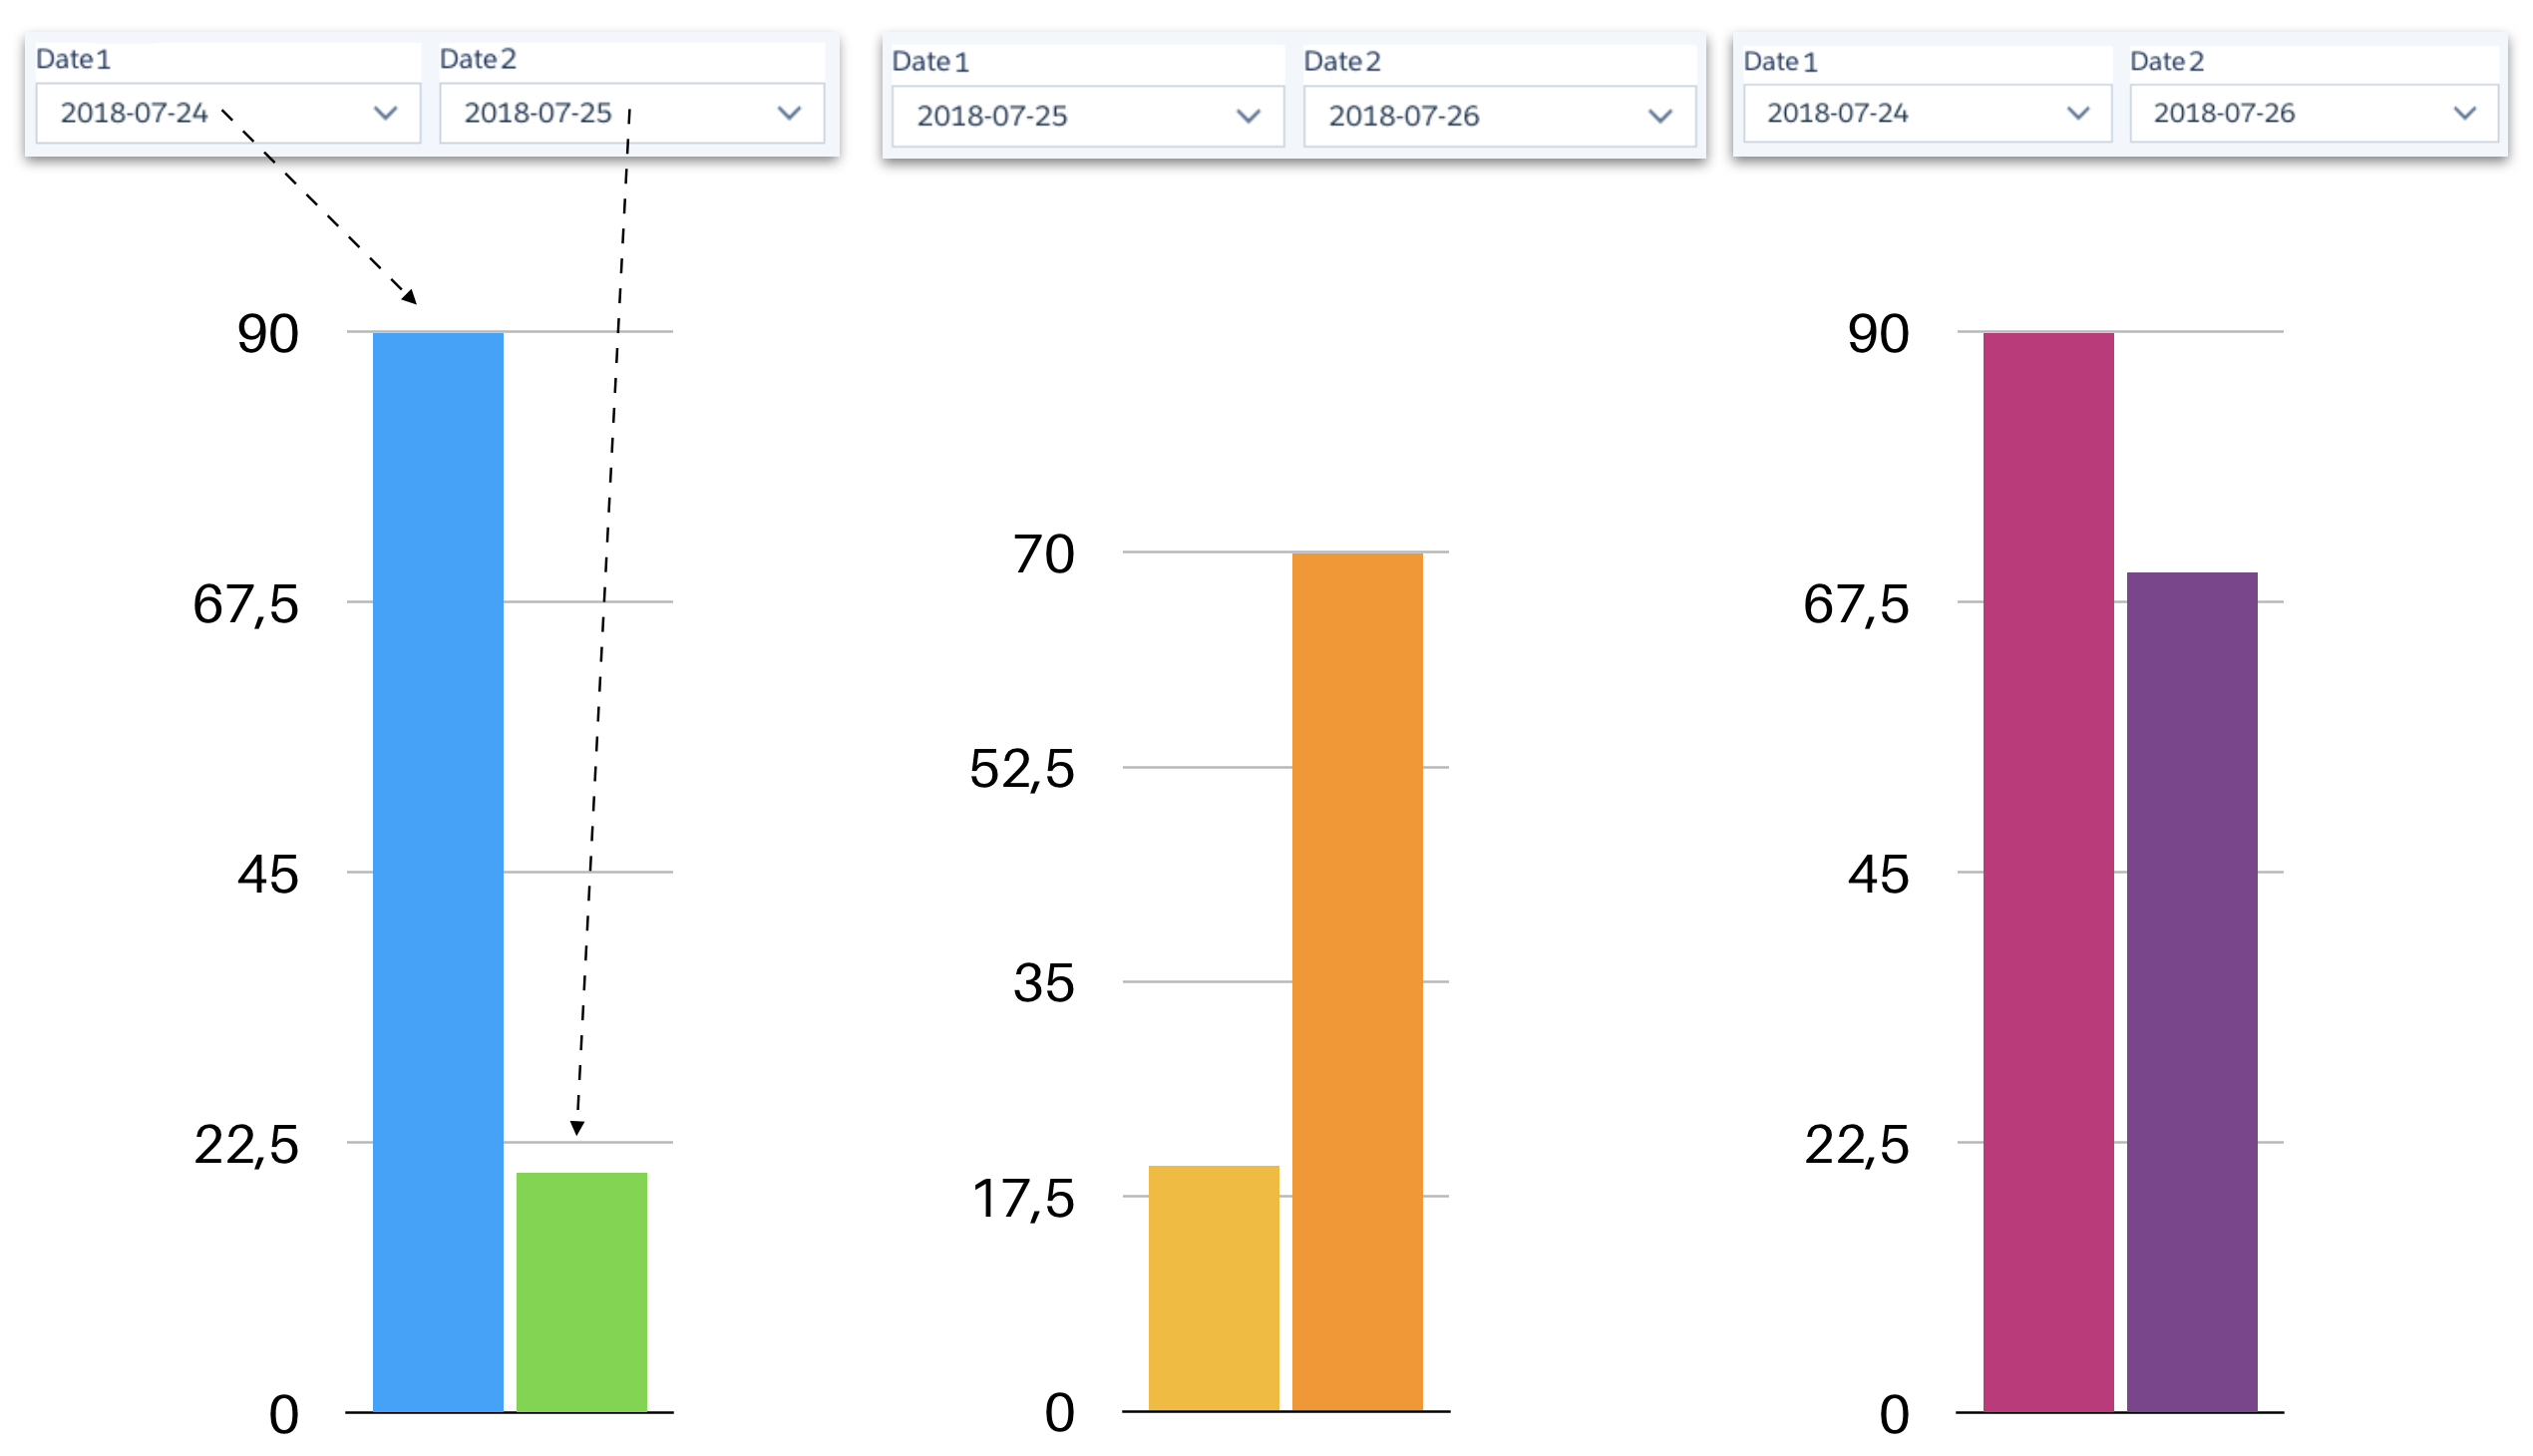
Problem: I guess until this point everything was clear. The problem I was facing with was to define two date fields (as string) ‘Snapshot Date 1’ and ‘Snapshot Date 2’ and filter the data ‘Revenue’, ‘Price’ etc. on selection.
The tricky part was having only one table (dataset). So I defined two columns for date (as string) which are calculated (computeExpression) everyday when the data flow run happens.
When you use one field ‘Snapshot Date 1’ and select a date, because of faceting, every element on the dashboard was filtered. This restricts comparison of two dates.
Overcoming such a problem requires ‘disabling faceting’ on the list selector fields and on the chart and define manual binding of the fields as filters to the steps.
revenue comparisons for two different snapshot dates
Solution: I basically modified the compare table, disabled the faceting and bound the steps with list selectors in a custom fashion. The bottle neck was the binding filters and the steps.
To do that hit Ctrl+E (windows), Cmd+E (mac) and edit the code as below for each column you want to filter per list selector.
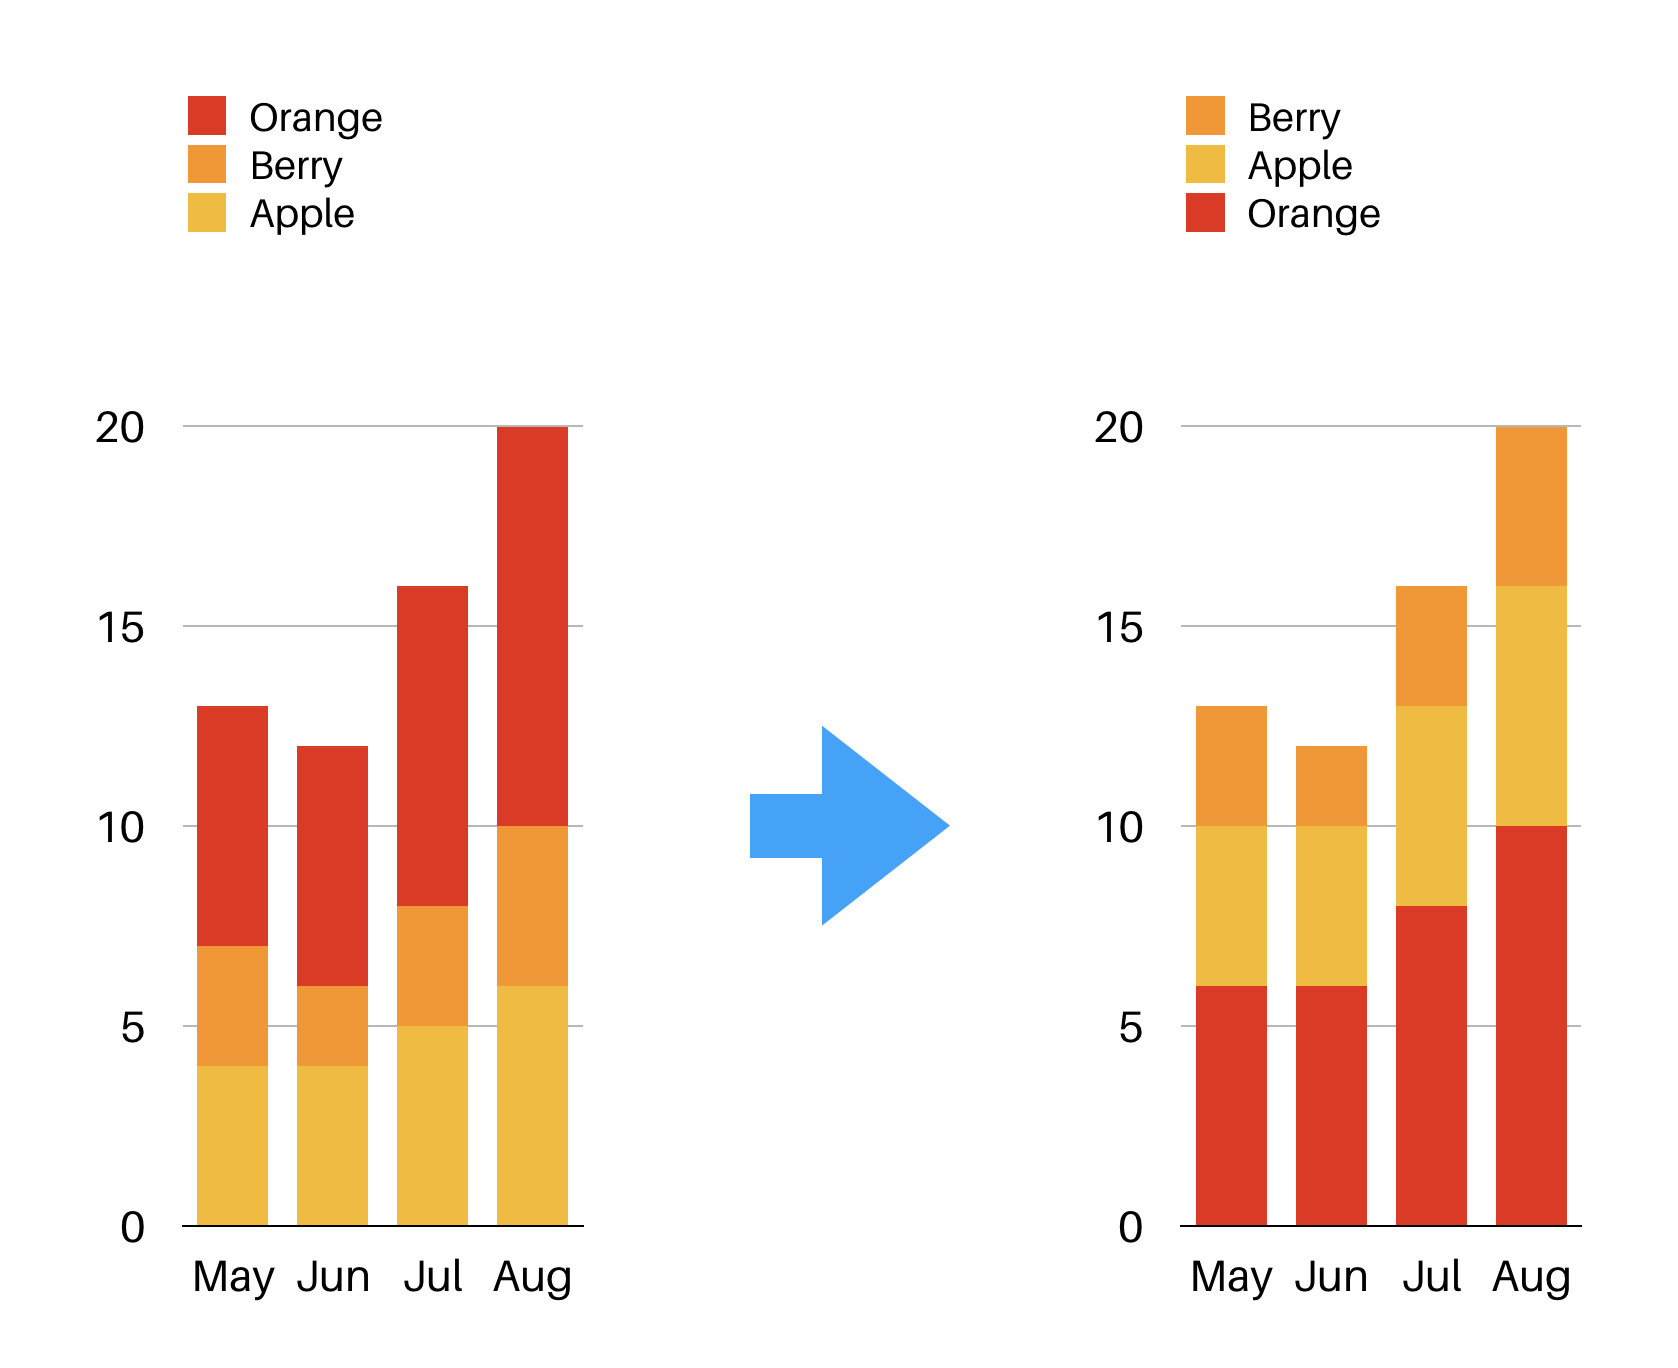
Recently I tacked with the problem of ordering the legend/bar segments in Einstein Analytics and this is how I solved it.
Using the Einstein Analytics user interface, I could sort bar segments of a stacked column chart in asc/desc order or keep it unsorted. However, I needed to sort them in a custom fashion like in the image.
Apparently, its possible by using custom SAQL and with final touches using the extended meta data a.k.a XMD.
Solution:
if you are familiar with Einstein Analytics, you know this one 😉
Then you need to add a similar code like the following into the SAQL code:
q = foreach q generate (case
when 'Fruits__c' == "Berry" then "03 Berry"
when 'Fruits__c' == "Apple" then "02 Apple"
when 'Fruits__c' == "Orange" then "01 Orange"
end) as 'Fruits__c';
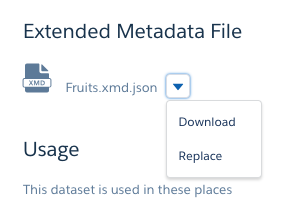
After this step, the legend is going to show its contents with numbers in front. To fix this using the eXtended Meta Data (XMD) .json file.
Go ahead download the XMD.json file after clicking “edit” dataset. As seen in the screenshot below, click “download” to get the latest .json file.
you will see it, when you click ‘edit’ dataset
Now you need to edit the “dimensions” part like in the example code below. Define the member and label fields, if you want to override the color as well then also color too.
Next step is to replace the XMD .json file. Click the ‘replace‘ button and upload the updated file.
Niceness! Now you have an ordered/coloured legend/bar segments in the stacked column chart and no more misleading/confusing numbers in front the legend elements.
Here we are climbing the steps of building a dataset by forming our very first dataflow. Don’t forget, it all starts with data and it’s better to have data of good quality. If you know the data that you’re working on, if you understand it well then Einstein Analytics will make your data easy peasy for you to interpret and visualize. In other words, make sure you know what to achieve with your data and have a good use case in hand, for validation and testing purposes.
Put your hands in the air, then on the keyboard & trackpad. 🙂 We are good to go.
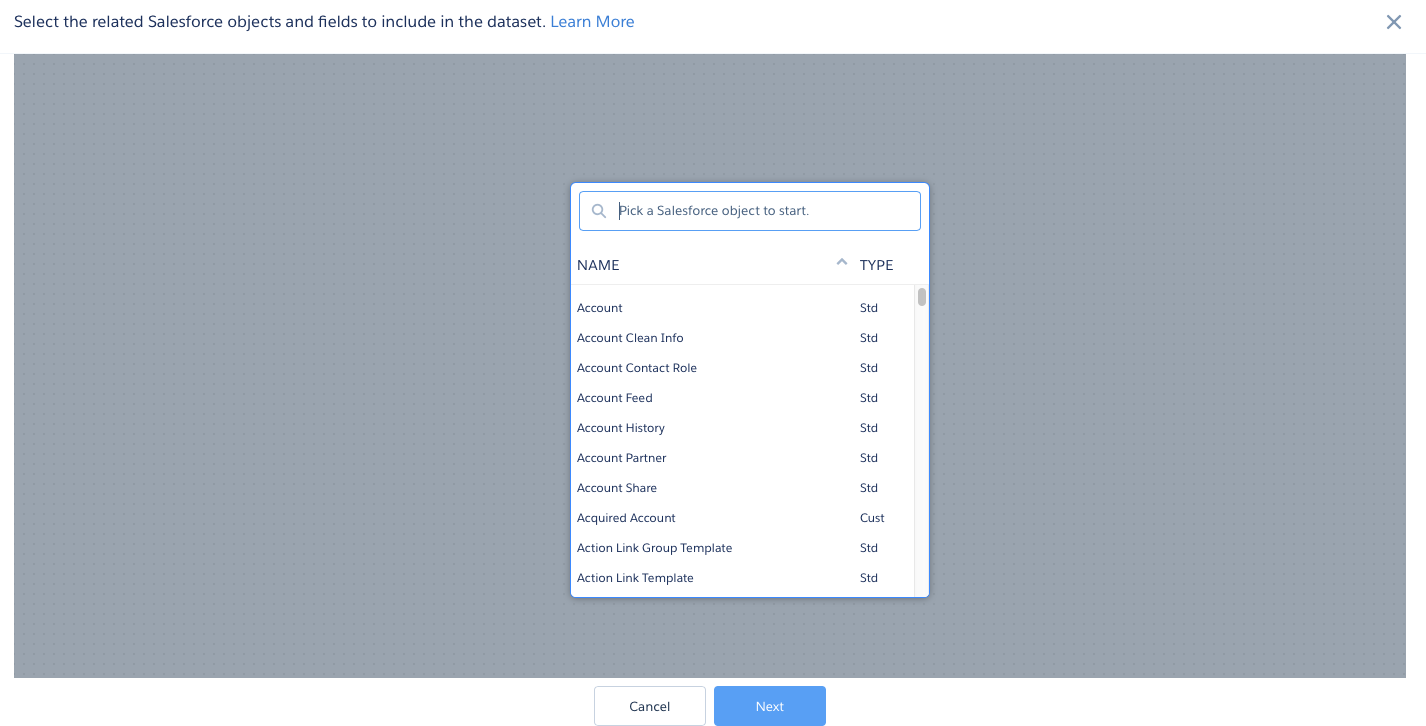
Remember the ‘create‘ button? You should be also remembering the SampleDataset and SampleDataflow titles. Next step is to pick the Salesforce or custom objects you have in the org and the fields that you want to include in the dataflow. When you click on it, the wizard will already take you to the next step.
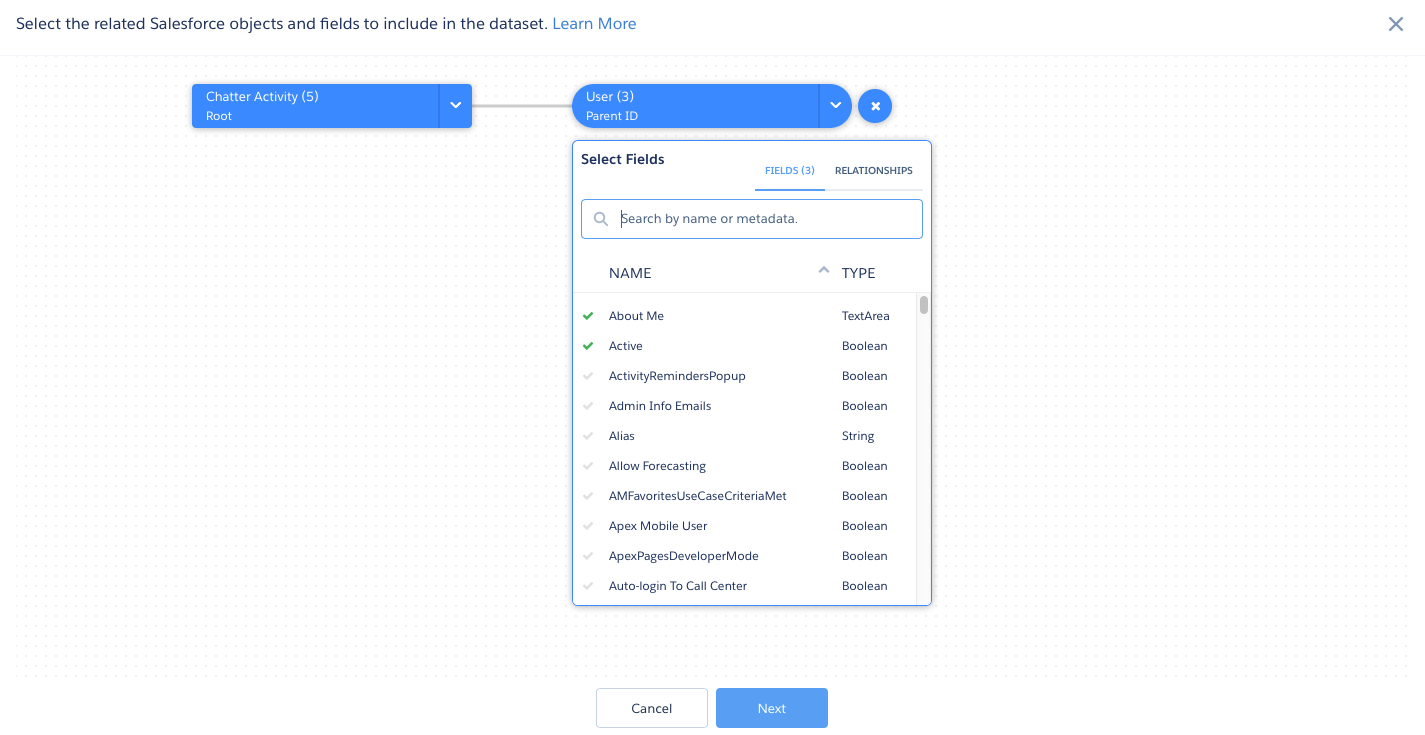
Now it is time to click on the object (the initial selection) and pick the fields you want to use (to be included in the dataset) also select the connections to other Salesforce standard or custom objects. You can select Fields and Relationships and each join click will make you access to another object and its fields. The wizard is a great help to get any field and object in the org.
Einstein Analytics team together made it really handy. If you already know the objects you are going to work with, simply selecting the parent (the top object) will give you an advantage. Joining a new object and selecting new fields will be simple clicks.
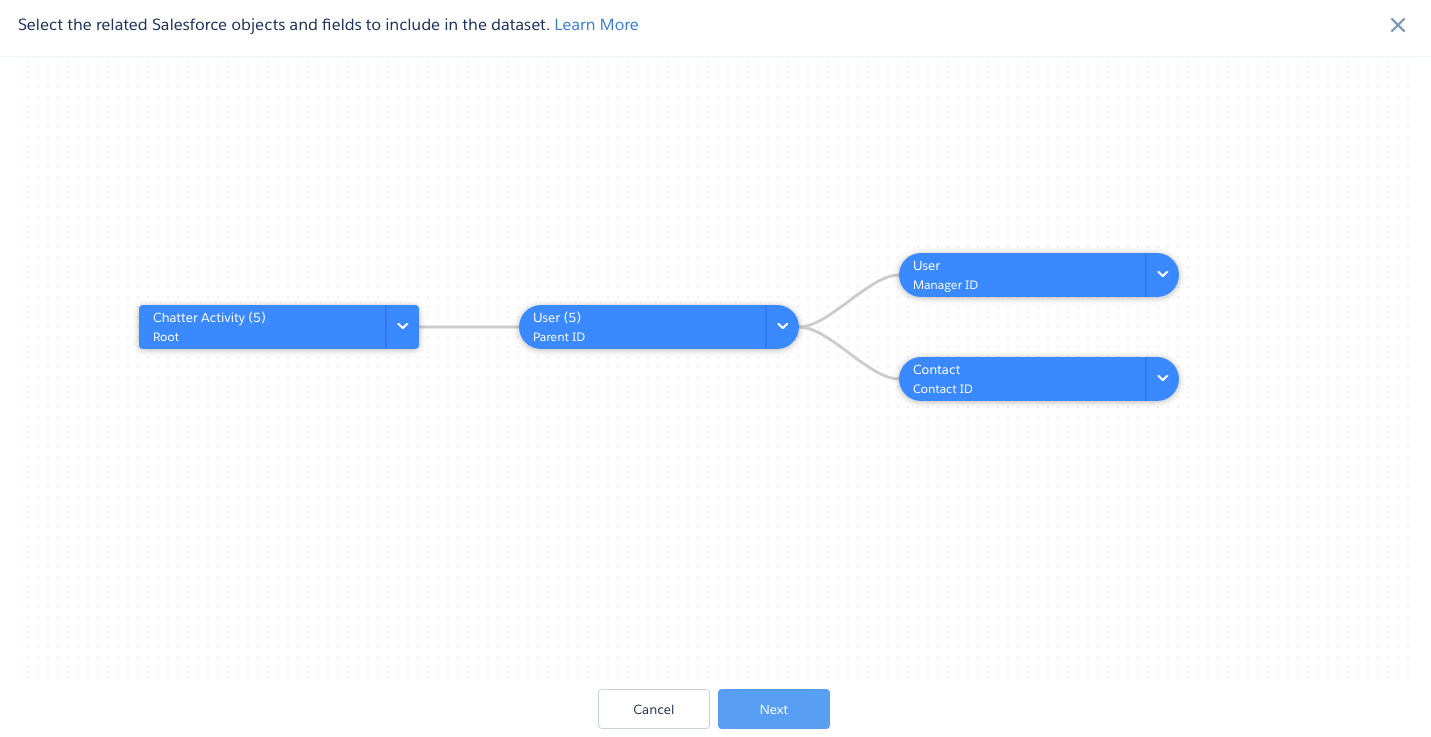
Go ahead! Play with the wizard, experiment, fail, break and learn how to use it with confidence and success. You can select the main node of the tree then add branches, like in this example. Once you are done with the wizard, you need to navigate and click Next.
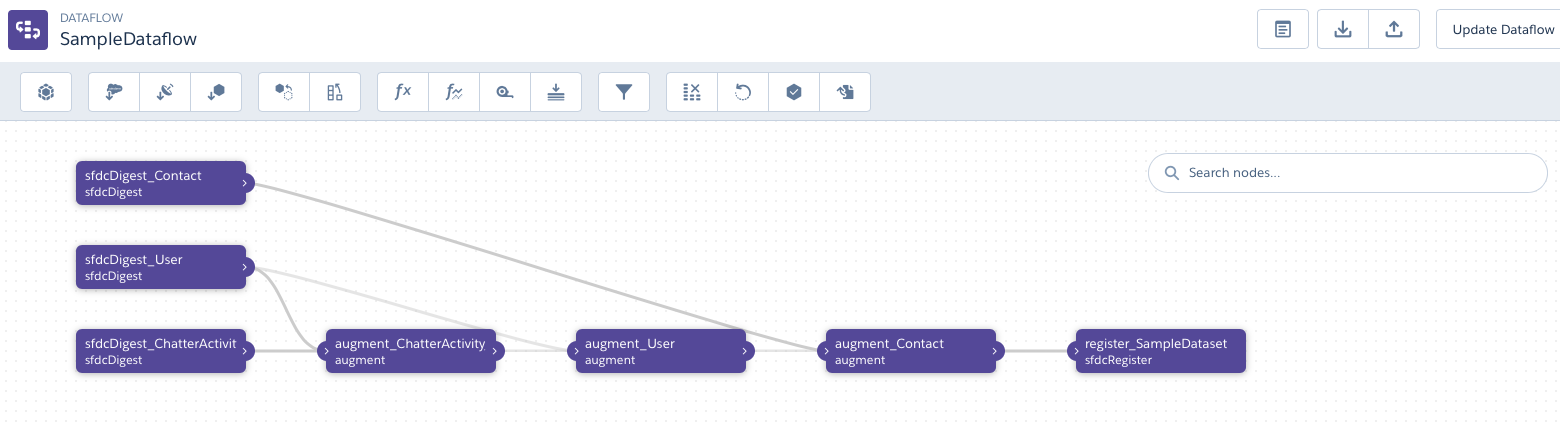
When you are done with the selections and click next, then your dataflow will be prepared by the wizard for an easier data engineering progress. Dataflow manager will generate the simple and complex dataflow, with respect to your selections. The dataflow may look like the screenshot below, but this screenshot is not the best possible one. It may differ with every other dataflow preperation.
Now we can get our hands dirty and dive into the world of manual dataflow manipulations, changes, fixes and building brand new dataflows from scratch. I hope you already are familiar with Transformations for Analytics Dataflows, if not check the post I linked above.


 Vanmoof Electrified S2 is a electric bicycle or pedelec as they say in Germany. It can support the rider up to 25km/h in Europe and 32km/h in the US. This Europe/United States change can be set via its mobile phone app. Download